Dynamic Datasets in Azure Data Factory
AZUREDATA FACTORY
2/20/20228 min read

This post will show you how you can leverage global parameters to minimize the number of datasets you need to create. Specifically, I will show how you can use a single Delimited Values dataset to read or write any delimited file in a data lake without creating a dedicated dataset for each.
Requirements
Some up-front requirements you will need in order to implement this approach:
An Azure Data Factory instance
An Azure Data Lake Gen 2 Instance with Hierarchical Namespaces enabled
At least Storage Blob Data Contributor permissions assigned to your Data Factory on your Data Lake.
Connectivity Setup
In order to work with files in the lake, first let’s setup the Linked Service which will tell Data Factory where the data lake is and how to authenticate to it.
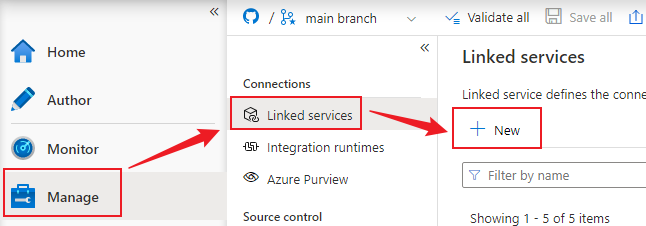
Navigate to the Manage section in Data Factory. Then in the Linked Services section choose New:
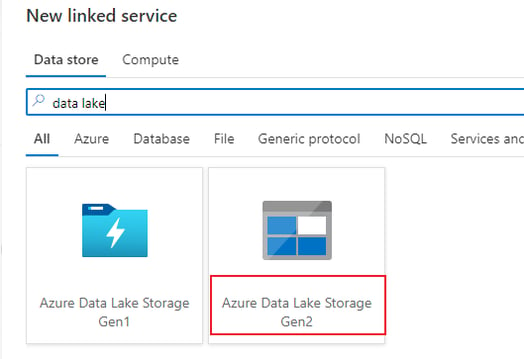
From here, search for Azure Data Lake Storage Gen 2.


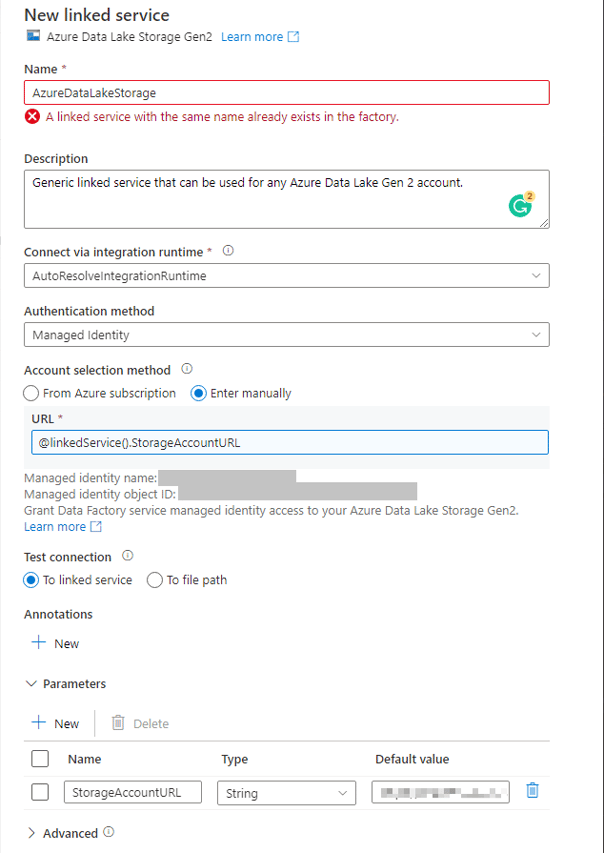
Provide the configuration for the linked service
Name: Give your linked service a meaningful name. Remember, it will be a generic linked service to be used for any data lake, thus try to keep it generic e.g. AzureDataLakeStorage.
Description: It is advised to always give your linked service a meaningful description to let other developers know the purpose of it and how to use it.
Integration Runtime: All linked services require an integration runtime – this indicates whether you will use the Microsoft provided compute power to perform the connectivity to resources, or if you want to use a custom On-Premises Azure Integration Runtime to connect to resources behind a private network. In this case, we can use the provided one since we are connecting to an Azure resource.
Authentication Method: The recommended authentication method in Azure is to use the Managed Identity of the service you are working with. This allows you to manage authentication as well as authorization via the Azure Role Based Access Control System. Additionally, it obfuscates access behind a service instead of a dedicated user or named credential which is better for security. We will use this for this demo as well.
Parameters: Create a new parameter called “StorageAccountURL” and give it the default value of your data lake’s endpoint.
You can retrieve this from the data lake’s endpoints section in the azure portal – choose the Data Lake Storage Primary Endpoint that looks like this : https://{your-storage-account-name}.dfs.core.windows.net/
Account Selection: Choose the “Enter Manually” option. In the URL text box, choose the “Add dynamic content” link that pops up. Click on the new parameter you created in order to add the reference to it in the text box.
Your linked service should look like this (ignore the error, I already have a linked service with this name. Yours should not have an error, obviously…):

Global Variable Setup
Now that we are able to connect to the data lake, we need to setup the global variable that will tell the linked service at runtime which data lake to connect to.
In this case we assume there will only ever be one data lake required for each environment (development, uat, production).
If you have multiple data lake accounts, you will need to create a lookup list in a file or database to store the list of Storage Account URLs to use and read that into the pipeline using a Lookup activity at runtime. Instead of referencing the global parameter for the storage account URL, you can reference the Lookup activity’s output column where the storage account url is stored. I will make a post on this in future as well. I have a life too you know, I do other things…
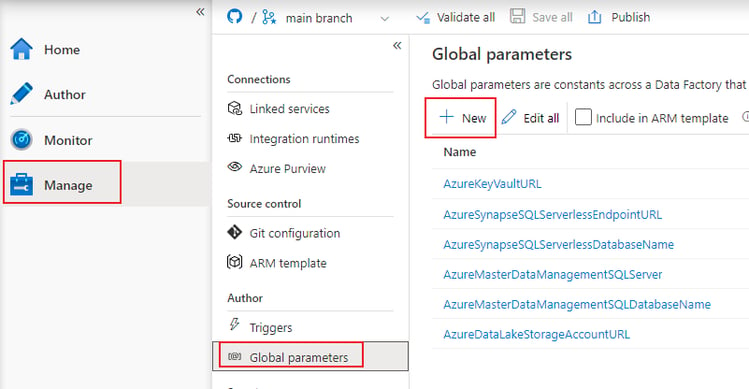
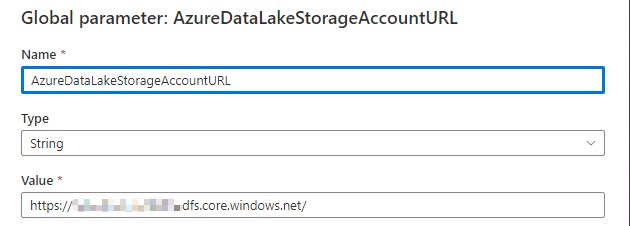
In the manage section, choose the Global Parameters category and choose New. Create a new parameter called “AzureDataLakeStorageAccountURL” and paste in the Storage Account Primary Endpoint URL you also used as the default value for the Linked Service parameter above (https://{your-storage-account-name}.dfs.core.windows.net/).


Dataset Setup
Now we can create the dataset that will tell the pipeline at runtime which file we want to process.
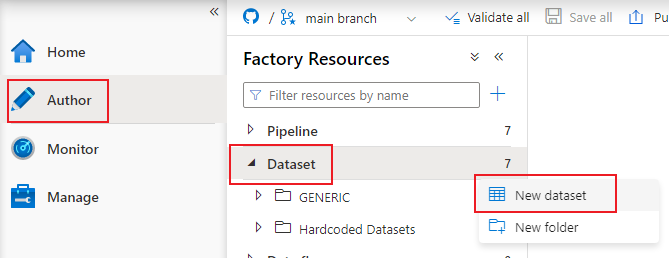
Navigate to the Author section, then on the Dataset category click on the ellipses and choose New dataset:
Search for Data Lake and choose Azure Data Lake Storage Gen2 – just like we did for the linked service.
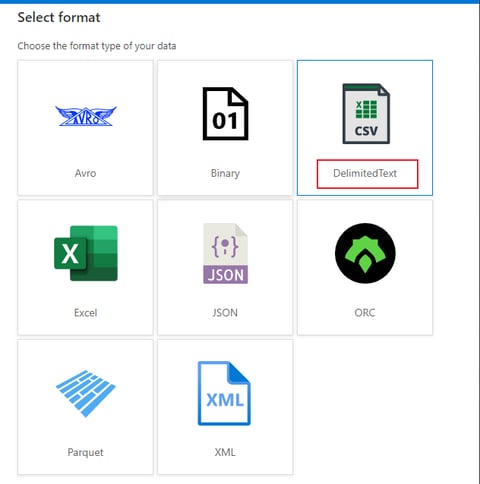
Then on the next page you have the option to choose the file type you want to work with – in our case DelimitedText.
Note that you can only ever work with one type of file with one dataset. That means if you need to process delimited files such as CSVs as well as Parquet files, you will need at minimum 2 datasets.
If you only need to move files around and not process the actual contents, the Binary dataset can work with any file. But in our case we want to read the data and write it to a target system, so Binary will not be sufficient.
Choose the linked service we created above and choose OK. We will provide the rest of the configuration in the next window.
To setup this dataset to work with any delimited text file in the data lake, do the following
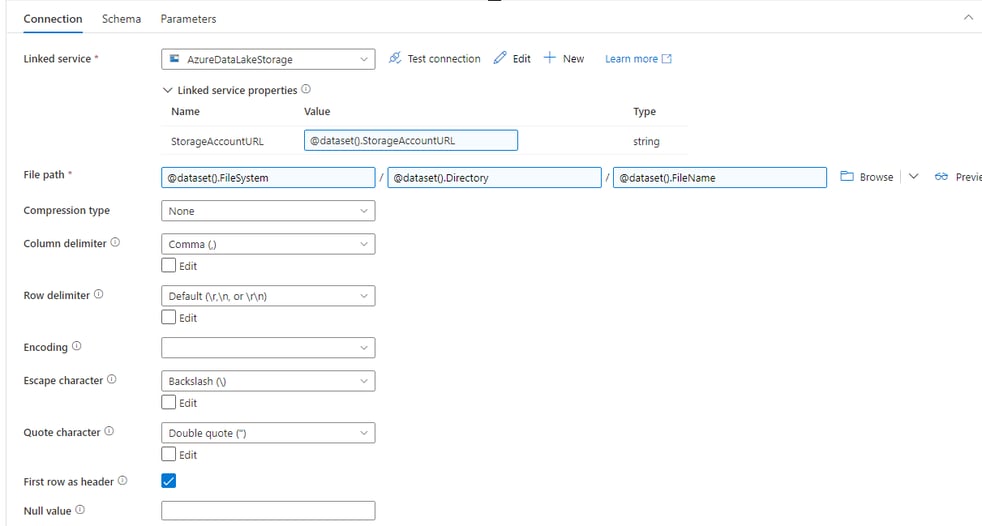
Give the dataset a meaningful name: Note that you have three options for the path of the file. In some scenarios you may want to parameterize all three, sometimes only the FileSystem and Directory, and other times only the FileSystem. Include the level to which the dataset is parameterize in the file name to ensure it is easy to choose the correct one when defining your copy activities. The naming convention I typically use is : {Azure/OnPremises}_{StorageSystemType}_{LevelOfParameterisation}_Generic e.g. Azure_DataLake_FullFilePath_Generic. You can alter the “FullFilePath” depending on which of the three items you choose to parameterise.
On the parameters tab of the dataset, create four parameters.
FileSystem
Directory
FileName
StorageAccountURL
Note, when working with files the extension will need to be included in the full file path. Thus, you will need to be conscious of this when sending file names to the dataset at runtime. In our case, we will send in the extension value with the parameters argument at runtime, thus in the dataset setup we don’t need to concatenate the FileName with a hardcoded .csv extension.
Back in the Connection tab, for each text box, click on it and select “Add dynamic content” then choose the applicable parameter for that text box
In the Linked Service Properties section, click on the text box and choose to add dynamic content. Choose the StorageAccountURL parameter.
Typically a delimited file is not compressed, so I am skipping that option for now. If you have that scenario and hoped this blog will help you out – my bad.
Column Delimiter: This is the character used to separate the columns’ values in the file. This can also be driven from a parameter if needed – which means Comma, Pipe, Tab or any custom combination of character delimited files can be processed with the same dataset. More on this in other posts though.
Row delimiter: Depending on the source system that generated the file, the end of the record character can be different. Choose the most applicable one for your file. This can also be driven from a parameter if needed.
Encoding: This defines the character set used to read or write the file. Computers also need to use a lookup table to tell it what combination of binary values (1’s and 0’s) mean which alphanumeric character. There are many different types of lookup sets the computer can choose from. Check the properties of the file to determine the correct option for your use case. UTF-8 is most common. This can also be driven from a parameter if needed.
Escape Character: This is the character used to indicate in the file that a specific Quote Character is not actually a quote character, but is part of the column value itself. This can also be driven from a parameter if needed.
Quote Character: This is the character used to enclose a column’s values to ensure that if the column delimited character is party of a column’s values that it doesn’t force a column break. This can also be driven from a parameter if needed.
Most often the first line in a delimited text file is the column name headers line, so ensure to choose that check box if that is how your file is also defined. This cannot be parametrized.
Null value: This is how an empty column will be represented in the data e.g. an empty string or the work NULL. This can also be driven from a parameter if needed.
With this current setup you will be able to process any comma separated values file in any data lake.
In future posts I will show how you can parameterise all the other configuration values mentioned above so you can process any combination of them with the same dataset as well.
Your dataset should look something like this:



Using the new dataset
In the Author tab, in the Pipeline category, choose to make a new Pipeline.
From the Move & Transform category of activities, drag and drop Copy data onto the canvas.
Source Configuration
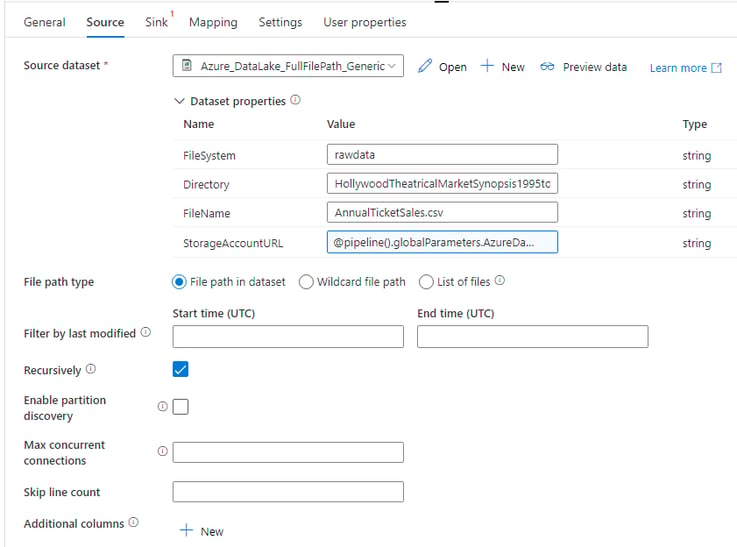
On the source tab of the activity
Choose your new Dataset from the drop down
Provide a value for the FileSystem, Directory and FileName parameters – either manually or using dynamic content expressions.
For the StorageAccountURL, choose to add dynamic content. Then choose the “AzureDataLakeStorageAccountURL” global parameter we defined earlier.
It should now look something like this:

The sink configuration is irrelevant for this discussion, as it will depend on where you want to send this files data.
Just to have the example functional, use the exact same configuration, except change the FileSystem or Directory value to effectively copy the file to another location.
Conclusion
With the above configuration you will be able to read and write comma separate values files in any azure data lake using the exact same dataset.
This ensures you don’t need to create hundreds or thousands of datasets to process all your data.
This example focused on how to make the file path and the linked service to the data lake generic. However, as stated above, to take this to the next level you would store all the file and linked service properties we hardcoded above in a lookup file and loop through them at runtime. In that scenario, adding new files to process to the factory would be as easy as updating a table in a database or adding a record to a file. Look out for my future blog post on how to set that up.
Social
All content on this website is either created by us or is used under aa free to use license.. We create the posts here to help the community as best as we can. It doesn't mean we are always correct, or the methods we show here are the best. We all change and learn as we grow, so if you see something you think we could have done better, please reach out! Let's share the knowledge and be kind to each other!
DIAN
GDG
FRANS
